Facebook, Fundingpress, Google plus, social login app, Twitter
How To Set Up The Google Plus, Facebook and Twitter Application for Social Login With Fundingpress
This article will show you exactly how Fundingpress Social Login works and take you through each part of the process, one step at a time. More on wordpress Skywarrior gaming themes!
Google+ Social Login
The first thing you need to do is go to console.developers.google.com/projects and give your project a name. After you wait a couple of moments for the set up to be finished, you will be able to see the Project Dashboard so just click on APIs and auth and then click on Credentials.
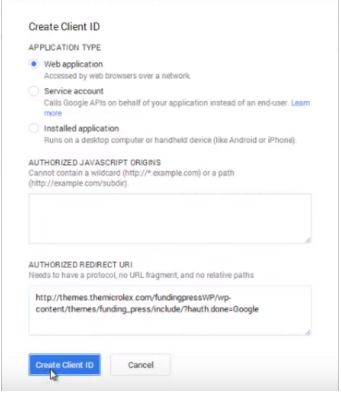
In the window that appears next, you’ll have to select Create new Client ID, click on Web application but make sure you delete the link that appears in the Authorized Javascript Origins.
Also, you need to enter the following URL in the Authorized Redirect URI section: copy the link of the Fundingpress theme and add the following credentials:
wp content/themes/funding_press/include/?hauth.done=Google.
Make sure you save all changes and there you go…Google Plus Social Login is created.

Facebook Social Login
In this case, you will need to go developers.facebook.com/apps and click on the Create new app button that is in the upper right corner of the page. You will have to name your app and also select a Category for it. Hit the Create App button and the application will be created.
You’ll need the APP ID and APP Secret links so just click on Show, enter your FB password and then copy those 2 links into Theme Options, under Facebook APP ID and Facebook APP Secret sections. After you click save, copy the domain name, go to Settings and enter it under Basics – App Domains.

After this, you’ll need to go to Status and Review. As you can see, Facebook gives you some approved items but the login permissions that appear will not be used for this purpose.
The only thing that you need to do is click the button that appears at the top of the page in order to publish your application and make it live. And for that you need to enter a proper email in the Settings section. Only after completing this step, you will be able to make your app available to all users and get it ready to be used with the Fundingpress theme.
Twitter Social Login
Go to apps.twitter.com and click on Create new app. Give your application a name and paste your website URL in the Website field and also the Callback URL beneath. Click yes at the bottom of the page, to agree with the Developer Rules of the road and finally click on Create your Twitter application.
You will have to go to Settings and make sure you check the box that says: Allow this application to be used to sign in with Twitter then click Update settings at the bottom.
After that click on API Keys near Settings and copy the API Key link in Theme Options for Twitter Social Settings. Do the same with the API Secret link and paste it under Facebook APP Secret in the same location.


